Pages

Friday, October 15, 2010

Friends Gatefold


Here is the final card of the Greenhouse Gala Series.  Today's card is my first attempt at a gatefold card.  It isn't shown in this picture but I made the rick rack design of the paper actually align on both sides so that there is quite a nice flow going on behind the flower center.  I also added some designer paper inside the card to make it flow and coordinate.  

I hope this week-long series featuring Greenhouse Gala and Friends Never Fade has inspired you somehow.  I like the idea of having a week-long event on my blog.  Perhaps I will feature another couple Stampin' Up! products next month...  Stay tuned!  

Thanks for stopping by!  

Happy stampin'!

Stamps: Friends Never Fade
Ink: Chocolate Chip, Real Red, Pumpkin Pie
Paper: Chocolate Chip, Real Red, Whisper White cardstock, Greenhouse Gala DSP
Accessories: Many Marvelous Markers, Paper Snips, Stampin' Dimensionals

Thursday, October 14, 2010

Friends Pear Breeze


LOVE.  LOVE.  LOVE.   This is my favorite card in the whole lot this week.  I love the soft overall colors.


I especially love the sparkly flower middle. (Sigh.) Gotta love the sparkles! Right? 

Thanks for stopping by! 

Happy stampin'!


Stamps: Friends Never Fade
Ink: Baja Breeze, Pear Pizzazz
Paper: Pear Pizzazz, Baja Breeze, Whisper White cardstock, Greenhouse Gala DSP
Accessories: Cutter Kit, Dazzling Diamonds, Paper Snips

Wednesday, October 13, 2010

Greenhouse Baja


Card number 3...  lets see lets see!!  

BEAUTIFUL isnt it?! :)  So remember the stamped image on the Pumpkin card from yesterday?  I told you how much I loved coloring that stamp with my markers and how beautiful it came out, right?  So I colored more of that same stamp with those same colors and I just HAD TO use it on another card.  Here it is!  Isn't it beautiful?  So easy too!!  You gotta try coloring that stamp yourself! 

For this card's layout, I consulted Mojo Monday to help me out.  They have fabulous card layouts every Monday. You should try it sometime.  Whenever I'm stumped on a card layout, I love visiting them for a challenge.  It kicks my mojo into high gear and I always feel accomplished when I finish a card using one of their layouts.  I feel like I get to play with the pros a little bit :)  I say that because when you see the cards submitted for the layouts, they are just gorgeous, fabulous and amazing! 

Whaddyathink?  

Thanks for stopping by! 
Happy Stampin'! 


Stamps: Because I Care, Friends Never Fade
Ink: Real Red, Pear Pizzazz, Baja Breeze, Pumpkin Pie
Paper: Greenhouse Gala DAP, Pear Pizzazz, Baja Breeze cardstock
Accessories: Real Red Satin Ribbon, Many Marvelous Markers, Stampin' Dimensionals

Tuesday, October 12, 2010

Pumpkin Friends


Onto our second card for the week....  
Pumpkin Pizzazz....  hehee.  I like mixing up the colors names sometimes.  

Anyway, today's card is simple and wow.  I colored the stamp with my markers to achieve the multicolored stamped image (on Very Vanilla cardstock).  When I stamped the image and saw that it came out beautifully, I just HAD TO put it on its own card. It blended really well with one of the sheets in the designer series paper pack. Even though the card has no sentiment on the front, it still came out to look complete, don't you think?  Quite an addition to the loot :) 

Happy Stampin'!  

Thanks for stopping by!


Stamps: Friends Never Fade
Ink: Real Red, Pear Pizzazz, Pumpkin Pie
Paper: Pumpkin Pie, Very Vanilla card stock, Greenhouse Gala DSP
Accessories: 1/8" Very Vanilla Taffeta Ribbon, Many Marvelous Markers, Glue Dots

Monday, October 11, 2010

Daffodil Friends


This whole week will be devoted to the Greenhouse Gala Designer Series Paper and the Friends Never Fade stamp set.

I really love this paper.  At first the prints seemed to bold for me to use (I'm always a skeptic, right?).  I kept seeing projects and cards made using this paper and they all came out beautiful. So I learned to like it and work with it.  Once I got the hang of seeing the bold prints, I paired it with the Friends Never Fade stamp set. FABULOUS!!  It was like... tah dah!!  Magic :)  This particular card was the first one I made out of the set.  I would say it's my least favorite of them all.  I think its because I'm missing some sort of sentiment on the card front or its just a tad bit too yellow for me. (Why would I make a card that even I think is too yellow is beyond me....)  Whatever it is, there is something off about this card in my eyes.  In the end though, it blends in with the rest of the lot.  Stay tuned this whole week to see the rest of them. 

Happy Stampin'!


Stamps: Friends Never Fade
Ink: Pear Pizzazz, Daffodil Delight, Pumpkin Pie
Paper:  Daffodil Delight, Whisper White cardstock, Greenhouse Gala DSP
Accessories: 1/8" Daffodil Delight Taffeta Ribbon, Scallop Circle Punch, Paper Snips

Friday, October 8, 2010

Playful Birthday


Here's a quick card made using the level 3 hostess set Playful Pieces.  At first glance, I found this set to be a little overwhelming since there were so many pieces. However, as I was playing with this set, I realized that there are so many possibilities with all the little pieces of this set.  I didn't get to show how versatile this set is, but I assure you this is a good set to play around with.  I think I may just surprise myself with what I can come up with.  

Hope you're having a fab Friday!  Enjoy your weekend!

Happy stamping!
Thanks for stopping by!

Stamps: Playful Pieces, Teeny Tiny Wishes
Ink: Poppy Parade, Sahara Sand, Not Quite Navy, Whisper White
Paper: Poppy Parade, Sahara Sand, Not Quite Navy, Very Vanilla cardstock
Accessories: Small Heart Punch, Modern Label Punch, Silver Brads, Paper Snips, Stampin' Dimensionals

Tuesday, September 14, 2010

Vintage Amour


Amour! 

I really LOVE this card.  It has taken me a while to get this card posted simply because I enjoyed looking at this beauty on my desk for a while.  Now that I think about how I came up with this card, it seems a little funny.  I had been playing with my new stamps that day and I experimented with all these elements.  I knew I wanted to use the Newsprint DSP so I cut some of that up. I had seen people stamp images right on the DSP so I tried that too.  Then I remembered a technique I used to love doing: antiquing (or sponging). I loved it so much that all my projects had some sort of antiquing done to it which is why I had to stop using it for a while.  I sponged the edge of the 'Amour' sentiment and tapped the same sponge on to the Eiffel tower image.  Once that was done, I had to come up with a card base.  What is a card without a base, right?  So I stamped Crumb cake ink on to crumb cake card stock.  I then punched some Cherry Cobbler card stock using the Scallop Trim Border punch. I literally tied all the pieces together with a big black ribbon.  I really LOVE how this all came together.  It was a hodgepodge mess when I was creating it but it came out to be SUCH A BEAUTY!! 

Have I said I love this card??  

Thanks for stopping by!  

Happy stampin'! 


Stamps: Artistic Etchings
Ink: Basic Black, Early Espresso, Cherry Cobbler, Crumb Cake
Paper: Crumb Cake, Cherry Cobbler, Very Vanilla cardstock, Newsprint DSP
Accessories: Cutter Kit, Scallop Trim Border Punch, Stamping Sponges, Snail, Corner Rounder Punch, Basic Black Satin Ribbon

Wednesday, September 1, 2010

Poppy Elements


Starting off September on a good note.  Here's a pretty card for your viewing pleasure (or to CASE, whichever works for you).  I know there is a whole bunch of super cool and super yummy new stampsets in the new catalog that I could have used but I just LOVE this stamp set.  Its so simple to use.  At first, I thought that the big stamp was going to be daunting but its really such a breeze.  It has become my 'go-to' stamp set so far.  It totally makes a quick beautiful card in a hurry. 

For this card, I stamped the image in Early Espresso on Whisper White card stock and then colored in the flowers with Poppy Parade and the leaves with Pear Pizzazz.  Don't the names of the new colors all sounds so yummy?  I then lined the inside of the card with Pear Pizzazz card stock and tied some Real Red Satin Ribbon on the top to finish it off. 

Its a simple card for any occasion. I just love how it all came together. 

Stamps: Elements of Style
Ink: Poppy Parade, Pear Pizzazz, Early Espresso
Paper: Whisper White, Pear Pizzazz cardstock
Accessories: Scallop Border Punch, Real Red Satin Ribbon

Friday, July 30, 2010

Stampin' Addicts New Catalog MEGA Blog Hop


Welcome to Stop #1 on the Stampin' Addicts New Catalog MEGA Blog Hop! This Blog Hop features 25 Stampin' Addicts members who are sharing their creativity with us. Each stop will feature products from the new 2010-2011 Idea Book & Catalog!

You may have just come from Krystal's blog Krystal's Cards and Morewhere she showcased some GORGEOUS projects using the Broadsheet Alphabet stamp set.

Today I am showing some ideas using a level 2 hostess set: Cute by the Inch

My first card is a simple one.  I used two of the images in the set to create a simple design trio. I love the greco design of these two images.  It reminds me of my trip to Italy and Greece.

 
My second card is a little more complicated.  I again used the greco style image to create my background on Crumb Cake cardstock.  I used a stamp-a-majig to line up the images nicely.  I then used the Owl punch to give my card a centerpiece.  I absolutely LOVE this owl!  It totally makes me smile the rest of the day when I see it.  I also love that he can have multiple personalities just by moving his eyes.  Isn't he adorable? 

My last project is a 3d Item.  I made a simple milk carton for a give away.  The Cute By the Inch images are absoluteley perfect for the milk carton die.  Its a quick and simple embellishment that packs quite a spectacular punch.  The milk carton die is made of Read Red textured cardstock and spritzed with Vanilla smooch spritz. 

I hope you've enjoyed these projects. Next stop on the Blog Hop is Holly over at InkPaperStamps. She will be showcasing a level 1 hostess set called Because I Care

Have fun creating your own masterpiece! 

Thanks so much for stopping by!

Thursday, July 29, 2010

Sweet Ice Cream Scoops

 I love Strawberry and Vanilla ice cream, in the summer especially. So I thought of all the different ways I like eating my ice cream:  on a cake cone, on a waffle cone, in a bowl or stacked high on a sugar cone. I like my ice cream plain most of the time or with caramel syrup once in a blue moon. Not a big fan of chocolate syrup or raspberry sauce, nor am I a fan of sprinkles and gummies on my cold creamy treat. I do love fresh fruit with my frozen creamy goodness. 

So today's project features ICE CREAM!!  I played around with the Sweet Scoops stamp set from the Summer Mini Catalog. It was so much fun to play with this set! I just made some simple 3x3 note cards with these ice cream cones.


Here are some close up pictures for each card.


Hmm...  Now I think its time for some Ice Cream.

What's your favorite ice cream?  How do you like it?  With toppings?
Yummm.....  Lets have a pretend ice cream party and share all the yummy goodness while we stamp!
Join the 'party' and leave a comment below :)

Come back tomorrow for the Stampin' Addicts New Catalog MEGA Blog Hop! Its going to be FABULOUS! 27 stops of fab new stuff! It will start around 9am PST.  See you there!

Thanks for stopping by!


Monday, July 19, 2010

Tempting Favorite

A simple card for today. I'm still using the same stamp set and designer series paper as the last two posts: Tropical Party and Island Oasis DSP.  I really like how I can use the same two things and make a wide array of designs.  Don't you just love that!??!


Here's a close up of the sparkly flower.  I'm not sure if you can tell from this picture that there is glitter in the middle of the flower.


Stamps: Tropical Party, Favorite Thoughts
Ink: Tempting Turquoise, Old Olive
Paper: Island Oasis DSP, Whisper White card stock, So Saffron card stock, Tempting Turquoise card stock, Old Olive card stock
Accessories: Scallop Border Punch, Paper Snips

Saturday, July 17, 2010

Tropical Party Get Together

I absolutely LOVE the Tropical party stamp set.  It has quite the summery effect on me whenever I see it.  Don't these images just make you feel like a Mai Tai in Hawaii??  

I used the masking technique on this card to create the cluster of trees and cut out the coconut and the flower to make it pop out.


Its a Tropical Party weekend...   continuing yesterday's question....   

What scrumptious drink or delicacy would you have in YOUR coconut? Leave a comment below! 

Hope you're having a great weekend!
Thanks for stopping by!

Stamps: Tropical Party, In a Word
Ink: Chocolate Chip, Old Olive, Rose Red, Pumpkin Pie
Paper: Island Oasis DSP, Whisper White card stock. Old Olive card stock, Pumpkin Pie card stock
Accessories: Many Marvelous Markers, Stampin' Dimensionals, Paper Snips, Scallop Border Punch

Friday, July 16, 2010

Tropical Window

Here's a Tropical Party card to show you today.  This one was inspired by a sway card I received from a fellow demonstrator, Gayle (I'm sorry, I don't know her last name).  She's one of my upline's sideline. My upline only has one downline (me) so I join in their swaps with my upline's upline and sideline.  (Wow, that's a mouth full!)  Back to the card...  Working a full-time job sometimes makes me feel like my short 4 day weekends just are never enough to get rested and rejuvenated.  So I find myself dreaming of a Hawaiian vacation while I sit in my lovely windowless cubicle.  Gayle's card inspired me to make a window looking out to the beautiful tropical paradise just beyond my reach. 

The coconut represents the little taste of paradise within my reach. What's in the coconut you ask?  Hmmm... a nice blended strawberry peach smoothie with a hint of pineapple juice perhaps.  Oh that sounds SOOO GOOD especially in this heat!

What would YOU have in your coconut?  Leave a comment below!


Happy Friday!
Thanks for stopping by!

Stamps:  Tropical Party, Rough Type
Ink: Old Olive, Chocolate Chip, Rose Red, So Saffron, Always Artichoke, Tempting Turquoise, Pumpkin Pie
Paper: Old Olive cardstock, Soft Suede card stock, Whisper White card stock
Accessories: Curly Label Punch, Stampin' Dimensionals, Paper Snips, Hobby Blade

Tuesday, June 29, 2010

Seasons Greetings in June

Well, I haven't been able to take photos of my new cards showcasing the stamp sets in the current Summer Mini Catalog.  They're patiently waiting for me to bust out the camera and start taking photos of those beauties I've made.  I think you will all enjoy them.

In the mean time, I'm sharing with you a simple card I made for the holidays.  But its only June, you say?  Oh no no no.... I say but its ALREADY June!!  I made this card for the holidays that just passed.  (Seems like it was just last week, doesn't it?) This is the card I sent to everyone I wasn't going to be able to see during the holiday season.

Serene Snowflakes made its debut in the past Holiday Mini Catalog.  I absolutely LOVED this stamp set!!  It is simply gorgeous.  I don't see snow on a normal basis.  (I'm lucky if I see it at all when we go to the mountains  given that I live in Sunny Southern California.)  So seeing snowflakes as beautiful as these makes me think that snow is the most magical thing on earth!  Now if I lived in a different state, I may be singing a different tune.


In order to same some time with the many cards I wanted  to make, I chose a simple pattern for the card.   For the stamped white portion of the design, I also wanted to save some time.  I stamped a whole sheet of 8 1/2 x 11 Whisper White card stock with various snow stamps in three different colors.  I used two different shades of blue and Platinum Shimmer paint.  When I was satisfied with how much snowflakes I stamped on the sheet, I cut up the sheet in to strips of 2 1/2 x 5 1/2 (I may have those measurements wrong) to end up with about 6 strips per sheet.  I also wanted to have snowflakes on my card base and wanted a little more shine to the whole card.  I added a strip of a slightly taller piece of plain clear sheet, adhered it to the card base and stamped a few snowflakes on it with shimmer paint.  The sentiment is also stamped using shimmer paint.  To complete the whole ensemble, I couldn't send this lovely handmade card out with just a naked envelope so I stamped a couple snowflakes on the envelope and it was ready for mailing.

Hope you enjoyed this card.   I hope to get some pictures taken and uploaded sometime soon so I can have more cards to share with you all.

ETA (7/1/2010):  Serene Snowflakes made its debut in the Holiday Mini which is obviously past its period. However, this lovely stamp set made it in the new Idea Book & Catalog!!!  If you want to get inky with this stamp set for the holidays, it is available for you to purchase from the new catalog which debuts today, July 1!!!  Get your copy today! You won't want to miss it.

Thanks for stopping by!

Stamp sets: Serene Snowflakes, Four the Holidays
Paper: Night of Navy card stock, Whisper White card stock
Ink: Platinum Shimmer Paint, Bashful Blue, Night of Navy
Accessories: Clear sheets, Sponge Daubers

Wednesday, June 16, 2010

Awash with Flowers

Here is a preview of a set that is coming out in the new catalog. Awash with Flowers.  At first, I didn't like this set.  I found it hard to visualize the images on paper and how they would all work together. I played with it for a WHILE before I settled with a design.  This card is pretty simple.  I was noticing a lot of panel-based designs in the blogging world and thought I'd join in and create one of my own. 


Thanks for stopping by!  


Happy Stampin'!

Stamp sets:  Awash With Flowers, Teeny Tiny Wishes
Inks: Summer Sum, Kiwi Kiss, Soft Suede
Paper: Soft Suede card stock, Kiwi Kiss card stock, Whisper White card stock, Summer Sun cardstock
Accessories: Linen Thread, Modern Label Punch, Stampin' Dimensionals

Monday, June 14, 2010

2010-2011 Idea Book & Catalog

Ready to reserve your copy of the new Stampin' Up! catalog? I am taking pre-orders for catalogs.  Catalogs will be sent out on around July 1, 2010. Click on the link on the top of the page reserve your copy today!

Thanks for stopping by!

Thursday, June 10, 2010

Elements of Style

When I first saw the new mini catalog, I knew this was a must have set.  The stamp itself is typically not my style, not usually the one I would gravitate to, much less purchase.  But I did. It was calling me right off the pages of the mini catalog and it was just begging me to ink it up. I chose to use this stamp set for the Color Q challenge in mid-May.  Here is the inspiration for this card:

Cute right??  At first, I found it hard to get all these colors together on one card but once I got my supplies together and started to put ink to paper, the juices just started flowing and in the end I was pretty pleased with what came of it.  Its good to step out of your comfort zone once in a while.  That is what's so great about these challenges. 


This card uses a retired color (Kiwi Kiss) and a couple retiring colors (Bermuda Bay and Summer Sun).  I'm really excited that these colors are going away, actually. (Not the normal sob story you usually hear, isnt it?) Personally, I never really used most of the colors that are retiring.  They just sat there and smiled at me but they aren't my go-to colors.  I think that is part of the reason why this color challenge was particularly challenging for me.  

Anyway, for this card I colored in the flowers with a Summer Sun marker and the leaves are colored in with an Old Olive marker.  Kiwi kiss didn't come in a marker so I took the closest green there was.  The humming bird is stamped in Bermuda Bay ink and cut out with paper snips.  I adhered it with dimensionals. 


Thanks for stopping by! 

Happy Stampin'!


Stamp sets: Elements of Style
Ink: Soft Suede, Bermuda Bay, Summer Sun, Old Olive
Paper: Soft Suede card stock, Summer Sun card stock, Kiwi Kiss card stock, Whisper White card stock
Accessories: Scallop Border Punch, Paper Snips, Many Marvelous Markers

Monday, June 7, 2010

Bouquet Bunch Pots

Here is today's card to share.  I'm still playing with the Mini Catalog stamps as I 'patiently' wait for the sneak peek stuff from the new catty. 


I'm still learning how to use the Smooch Spritz spray.  This is the first time I actually used the spray on a project.   When you get your smooch spritz, you will notice that the glitter tends to settle on the bottom when it sits for a while.  So you will have to shake the glass vial vigorously to get the glitter all mixed up in the smooch again.  Pretty simple and common sense, right? I'm not sure if it was a late night when I was stamping and I just wasn't paying attention or if I was just having a 'moment'....  but as I shook the vial, I felt a mist on my face and arm. First thing I thought was, "Is it raining?" Well... of course not! I'm only inside my stamp room on a warm California evening. The rain was no where near me. The windows were closed so why would there be a mist?  I wiped off the mist from my face and  I continue shaking the vial and it FINALLY occurs to me that its the spritz.  At this point, I have the spritz all over my hand, sprayed on my face and arm and some had found its way on my pants.  The spray nozzle had been unscrewed from the top of the vial and I hadn't bothered to check it before I started shaking.  It was silly of me. I was pretty upset with myself that night but now I just laugh at myself because I each time I remember this incident, I remember seeing myself in the mirror right before going to bed looking like a tiger-lady. Lesson learned:  Spritz comes off your skin pretty easily but not off your clothes. 


Thanks for stopping by!

Happy Stampin'!

Stamp Sets: Bouquet Bunch, Wood Grain
Inks: Soft Suede, Old Olive, Chocolate Chip, Regal Rose, Pretty in Pink, Always Artichoke, Apricot Appeal
Paper: Soft Suede cardstock, Very Vanilla cardstock, Old Olive cardstock
Accessories: Scallop Punch, Marvelous Markers, Twill Tape, Smooch Spritz Log Cabin

Wednesday, June 2, 2010

Going... going... almost GONE!

In anticipation of the upcoming catalog release, Stampin' Up! has released the Last Chance Lists for the 2009-2010 catalog.  Below are the lists for all the items that are retiring.  There are HUNDREDS UPON HUNDREDS of items retiring this time around because of the color renovation.  If you've had your eye on a few stamp sets, PLEASE check the retiring stamp sets lists and see if they are going away soon.  Items on these lists are available WHILE SUPPLIES LAST ONLY.  


Make sure you check the prices....  some of them are discounted! 

Questions?  Feel free to email me

Recruiting Promotion - June 2010


From June 1-30, 2010, you can start your own Stampin’ Up! business for just $99 with the special Mini Starter Kit!  The Mini Starter Kit—valued at over $180—contains the items listed below; while all items are recommended, you can substitute a like item of equal or lesser value.
  • Watercolor Trio stamp set (wood-mount)
  • I {Heart} Hearts stamp set (clear-mount)
  • Clear-Mount Block C
  • Homemade single stamp*
  • Whisper White card stock (8-1/2” x 11”)
  • Brights Collection assorted card stock (8-1/2” x 11”)*
  • Melon Mambo Classic Stampin’ Pad
  • Daffodil Delight Classic Stampin’ Pad*
  • Rich Razzleberry Classic Stampin’ Pad
  • Tempting Turquoise Classic Stampin’ Pad
  • Basic Black 1/8” taffeta ribbon*
  • Color Coach*
  • SNAIL Adhesive
*Sneak peek items!

The Mini Starter Kit also includes the same business supplies that are in the standard Starter Kit. Plus, new demonstrators who join Stampin’ Up! in June, you will receive a free box of 2010-2011 Idea Book and Catalogs during the first part of July!

Click here and contact me today for details on how to sign up! 

Wednesday, May 26, 2010

Sentimental Journey

I just had to start getting my mini catalog sets inked up!  They have been begging to be inked for a while now. Here's the first of my sets to get inked.... 


I totally love this card.  When I was first starting to create this, I was having such a tough time creating it. I stumbled many times before this design came together.  Pretty pleased with myself and my persistence in trying to get it together.  My favorite part about this card is the compass.  Take a look: 

Yup!!  Thats a brad!  Its the backside of a brad!!  Haha! I thought that was pretty clever. It looks pretty cool too.  The length of the brad legs was perfect.  Now, if only I made the compass turn north whichever way I moved, then THAT would have just been OUTTA THIS WORLD!!! 

Thanks for stopping by! 

Happy Stampin'!

Stamp Sets: Sentimental Journey, Pedaling Past
Inks: Garden Green, Night of Navy, Versamark
Paper: Garden Green cardstock, Pumpkin Pie cardstock, Whisper White cardstock, Travel Journey DSP
Accessories: Modern Label Punch, 1" Circle Punch, Silver Brads, Stampin' Dimensionals, Paper Snips, Clear Embossing Powder, Big Shot, Textured Impressions Embossing Folder, Tombow Multi Purpose Adhesive, Stampamajig

Tuesday, May 11, 2010

MIA???

Oh Boy!  This last month went by REAL FAST!  So many things happened as far as Stampin' Up! Yet I can't seem to keep up with stamping as quickly as new things are coming out!  Oh its madness!!  All these wonderful new toys but so little time to stamp.  

I do have a couple cards I have made to share with you all.  They're just waiting for a photo-op moment. :)  I will share them soon.  

Lets see... what's been going on.....

Have you seen the new Summer Mini catalog!?????  SOOO CUTE!!!  Lots of great new products in this one!  The Schmooz Spritz stuff is AMAZING.  I love it!  I just used it last night and I got it all over me because I couldn't stop using it.  It's addicting!  Gotta have shimmer shimmer shimmer on everything.  Its scary.  

May is National Scrapbooking Month.  What would scrapbooking month be with out any cool promotions, right?  Explore the possibilities of scrapbooking with FREE DESIGNER BRADS with purchase of certain stamp sets during the month of May.  Click here for more details on this great promotion.  

I'll be back soon with some cards to share.  

Happy stampin'!  


Wednesday, April 14, 2010

Color Renovation

Stampin' Up! has recently made a big announcement that I am very excited to share with all of you. 

For about two years, Stampin' Up! did a great deal of research regarding color trends. They held focus groups and surveys to get feed back from demonstrators and also took information based on sales about what colors we loved and which ones we didn't really use as much. With all the information they gathered, new color collections were born.  Starting with the upcoming catalog which will be released in July (IBC 2010-2011), the whole color family structure will be changed.  Our color families are becoming color collections

A few things to note about this change: 
  • If you've been a Stampin' Up! customer for a while now,  you may be glad to hear that some of the previous InColors are returning as core colors in the new color collection. There are 10 returning colors from the past: Tangerine Tango, River Rock, Riding Hood Red, Wild Wasabi, Baja Breeze, Pink Pirouette, Pacific Point, Melon Mambo, Soft Suede, and Rich Razzleberry.
  • We are getting 5 NEW COLORS in the new color collection: Daffodil Delight, Early Espresso,Cajun Craze, Cherry Cobbler, Marina Mist.  These colors are BEAUTIFUL!!!  They are wonderful vibrant additions to the core collections.  I can hardly wait to start playing with these colors and incorporating them into my projects. Once you see them, I'm sure you'll want to start playing with these colors as well.
  • Kraft is now part of the core collection!!  This beloved color is now a staple neutral color and it has received its own snazzy Stampin' Up! color name:  CRUMB CAKE!!!  You know what this means??   Yes,  it is not only available in cardstock but it will have its own ink pad too (and possibly some other items as well)!!! 
  • The InColor program is also part of the renovation.  We will be introduced to 5 new InColors with the 2010/11 catalog and they will be available for 2 YEARS!!!  It gets even better... with the 2011/12 catalog, we will be introduced to another set of 5 InColors giving us 10 InColors all together!!!  2010/11 InColors will retire with the release of the 2012/13 catalog but will be replaced with another set of 5 new InColors.  That gives us a constant 10 InColors to keep our art work "hip" and vibrant! We should hear about the new InColors sometime in June, so keep visiting for updates!
This is a pretty big change to our fundamental core element. With such a big change means that there will be 30 colors in our current color line up to which we will be bidding a fond farewell. The retiring colors are: Pink Passion, Pixie Pink, Pale Plum, Orchid Opulence, Lovely Lilac, Lavender Lace, Almost Amethyst, Bordering Blue, Brocade Blue, Ballet Blue, Brilliant Blue, Taken with Teal, Glorious Green, Handsome Hunter, Sage Shadow, Mellow Moss, Green Galore, Gable Green, Barely Banana, Yoyo Yellow, Summer Sun, Apricot Appeal, Only Orange, Really Rust, Ruby Red, Cameo Coral, Blush Blossom, Creamy Caramel, Close to Cocoa, Going Gray.  If any of these are particular favorites of yours, its time to stock up.  These colors (cardstock, ink pad, ink refils, ribbon, etc) will only be available through the end of June 2010. 

To place your order, visit my Online Store (click 'Shop Now' on the top right hand corner) or send me an email with your order and contact information.

I'm very excited about the new color collection.  If you'd like to learn more about the new color collection and would like to host a workshop, let me know.  I'd love to share this with you and your friends. 


Happy Stampin'!

Valerie

Thursday, April 1, 2010

Two Step into Spring!

Time to get ready for Spring!!  During the month of April,  Stampin' Up! is giving you a preview of the new Awash with Flowers stamp set.  When you host a workshop or place an order of $350 or more, you get this stamp set for FREE. Awash with Flowers is a sneak peek from the upcoming 2010-2011 Idea Book & Catalog! Be the first to add this stamp set to your collection.  It is available in both wood mount and clear mount (blocks C and H are recommended for this set, if you don't already have the blocks).  Online orders do not qualify for this promotion. If you are placing an order of $350 or more, please contact me to place your order so that you may take advantage of this great promotion! This sneak peek is only available throughout the month of April so don't miss this opportunity!  The next time this stamp set will be available will be in July when the new catalog is released. It will then retail for $39.95 as wood mount and $27.95 as clear mount. 

If that weren't enough,  there are also FOUR current stamp sets that are on sale for 20% off!!! If you've been debating on getting any of these stamp sets, now is the time to get them!!  The stamp sets on sale are: 

Greenhouse Garden (page 94)  Reg. $25.95  Now $20.76
Fifth Avenue Floral (page 98)  Reg. $24.95  Now $19.96
Flower Fancy (page 101)  Reg. $36.95  Now $29.56
Trendy Trees (page 112) Reg. $17.95  Now $14.36

This is a great promotion!  There is no minimum purchase to qualify for this special discount on these four stamp sets. I should note that these stamp sets are on the main catalog so that you may view the images and that they are only available as wood mount stamp sets.


And folks....  this is NOT an April Fool's joke!!

Happy Stampin'!!  


Tuesday, March 23, 2010

Bird Punch


 Here's a simple card utilizing punches and a stamp set.  I demonstrated this card at a recent workshop.  Its a simple card to put together and it packs a "ooh ... aahh" factor.  (Is that even a word?) :)  It comes together pretty quickly as it uses very little stamping and it uses mostly punches.

Happy Stampin'!

Supplies:
Stamps: Whimsical Words
Ink: Soft Suede
Paper: Crush Curry cardstock, Whisper White cardstock, Old Olive cardstock
Accessories: Scallop Border Punch, Extra Large Two-Step Bird Punch


Fox & Friends

Its been a while since I last posted a project.  Its been a crazy month however its been productive.  Today I'd like to share a card I recently made. I sent this card to a coworker who recently had twins, a boy and a girl. So precious!! Anyway, I realized that I didn't really have any stamp sets that had anything 'baby-ish' to make a congratulations card.  So I was a little bummed and nothing was coming to mind on how I could use my stamp sets for a baby card.  Call it crafters block, I guess.  I needed to get inspiration. So I went forth and did my routine blog-hopping and I came across Mary Jo Albright's blog post.  I love her work!  Her work never ceases to inspire me.  I pulled out my Fox & Friends stamp set and played around with it. Voila! Next thing I knew, this card was created.  


Yes, I know.  I got a little crazy with the paper snips.  Yes, I did cut all those pieces by hand. Crazy, I know.  But you know what....  I had a blast doing it.  I totally had a kick out of cutting up these animals that it didn't even seem like that much detailed cutting to me.  DEFINITELY LOVE THIS CARD!!! Isn't this monkey adorable!?!?  I made the animals (whole or part) pop up using dimensionals.  I think it gives it a much better effect that just a flat image. 


Hope you like it!  Happy Stampin'!


P.S.  The designer paper I used is retired from the last catalog.  I'm trying to use up the loads of retired DSP I have. 


Supplies:
Stamps: Fox & Friends, Well Scripted
Ink: Chocolate Chip, Pacific Point, More Mustard, Really Rust, Real Red, Creamy Caramel, Kiwi Kiss
Paper: Morning Sunshine Designer Series Paper (retired), Kraft cardstock, Chocolate Chip cardstock, Pacific Point cardstock, Whisper White cardstock
Accessories: Scallop Border Punch, Paper Snips, Stampin' Dimensionals


Thursday, March 11, 2010

Ribbon Shares Now Available!!!

Hi Stampers!!

Have you been browsing through the embellishments section of the catalog lately? Been eying those ribbons to add as a perfect embellishment to your project? Maybe you've thought of buying a roll of ribbon or two but decided you really want all the colors just not at that steep price?

JOIN IN THE RIBBON SHARES!!!

Click on the product shares link on top and sign up to get your favorite line of ribbons at a fraction of the price! This is an affordable way to get all the ribbons you WANT without breaking the bank. You get 3 yards of each color in each ribbon family.

If you have any questions, feel free to drop me a line.

Happy stampin'!


Monday, March 1, 2010

Last Month of Sale-A-Bration!!!

Howdy Stampers!!

Just a little reminder that today marks the beginning of the final month of Sale-A-Bration!! Still don't know what this means??? Oh boy... You're missing out!!!

Sale-A-Bration is the BIGGEST sale event that Stampin' Up! has every year.

For every $50 you get a free stamp set, paper pack or punch for FREE.

If your order is at $300 or more, contact me to place your order and get an EXTRA FREE stamp set, paper pack or punch plus hostess benefits.

Interested in becoming a demonstrator? Starter kits are at a 15% discount when you sign up during Sale-A-Bration. Contact me for more information.

So if any of these perks have sparked your interest, visit my online store to browse through the wonderful product available to you right now and fill up your cart! If you need a catalog, please contact me.

The sale ends on March 31, 2010.

Happy Stampin'!


Monday, January 25, 2010

Flight of the Butterfly

Third post today! Wow! (Just catching up on projects I had uploaded but haven't shared....)

Its a trend, I tell ya! Butterflies everywhere!!!

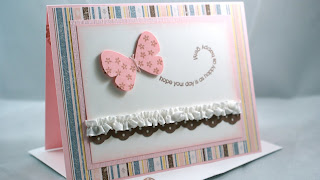
I just LOVE how this card turned out. I had a request to create a birthday card for a girl and this is the result of procrastinating to the night before they needed the card to create it. Turned out beautifully, didnt it? I just love looking at this card over and over and over and over.....

Of course, I still didn't have my butterfly punch to punch out this butterfly so I had to cut it by hand. It turned out well because I was able to give the little creature antennae :) hehe.


To create the ruffled ribbon, I used a technique I learned from Allison's blog. Coincidentally, she also used the same stamp set on her card for this particular post! Haha. I preferred this technique much better than just trying to fold the ribbon to create pleats for this project. It gave the card a little more of a 'dainty' and delicate feel to it.

Thanks for 'fluttering' by! :)


Stamps: Flight of the Butterfly
Paper: Pink Pirouette (retired, textured and regular), (retired DSP -- will update for the name), Close to Cocoa cardstock, Whisper White
Ink: Pink Pirouette (retired), Close to Cocoa
Accessories: White Taffeta Ribbon, Eyelet Border Punch, Paper Snips, Sticky Strip